After “I don’t remember how many” years, we have finally embarked on that long awaiting family room project. Ever since we moved here 14 years ago, the family room was the only one that we never touched. In fact, it has gotten so bad that Steph has challenged to me to take a look at what is “in” the couch and my barcolounger. “In” meaning….all of the bacteria and other mythical flesh eating microbes that could have survived 14 years of fat butts, pizza, Chinese food, potato chips, flatulence attacks, soda/beer, snot, coins, etc.
So yesterday, we commenced our Shopping for Furniture tour of Buffalo visiting 5 stores. These ranged the gamut of luxury at Calvins to the upper middle class of Bassett, to the middle of the road La-Z-boy to the where the rejected used car salespeople work at I won’t name the chains for fear of reprisals. All in all, even though we were not impressed with the “design consultant” at La-Z-boy, they had what we liked for what appears to be the most reasonably priced.
BEFORE:
This is what we are starting from. The challenge, as you can see, is to work with a rather narrow room of 10 feet and at the same time, maximize the seating arrangement. The length is a little over 26 feet. Too often, we find ourselves entertaining and people sit on either folding chairs or the floor. Ideally, we would love to have a sectional but it won’t work here. Click on the pictures for their enlarged version.
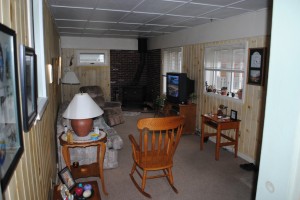 This is the view of the family room from the entryway that leads from the dining room. Note the windows on the right side. These windows face the afternoon sun (west). In all likelihood, we would love to hang a flat screen tv from the wall above the existing tv on the right side but I guess that will have to wait to see how much $ is left.
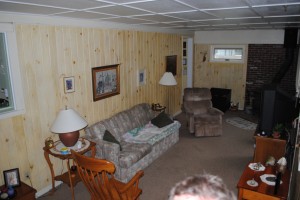 This is the view from the other side. Note on the far left side is the entryway to the office. And yes, that is the top of my head!
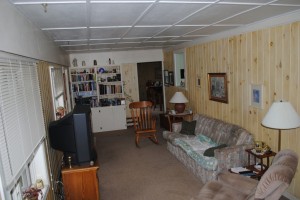 This is the view from the other side of the room above the wood burning stove. Can anyone see any flesh eating microbes on the couch or barcolounger?????
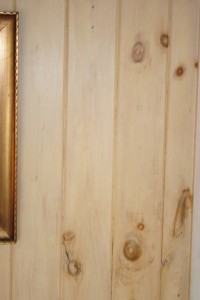 This is a closeup of the wall. We will keep them as they are. They are a yellowish hue knotty pine wood paneling. The paneling is real as opposed to the engineered wood most commonly seen these days.
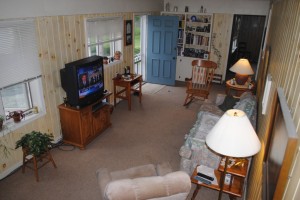 This is the view from the office entryway. Notice the door that leads to the backyard in the upper middle of the picture. Behind that door is a bookcase is built into the wall. And for those of you who are wondering, the ceiling is 8’4″ high.
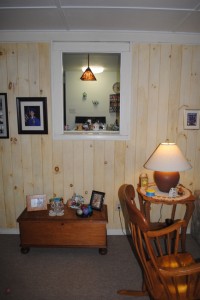 This is the view opposite the door that you saw on the left in the above picture. The window, above, separates the family room from the kitchen. The story behind this is the house used to be a small single family cape. Over the years, various improvements and additions were made. The family room is actually outside the original house and is basically a fully enclosed patio. Above the family room are parts of the house (boy’s bedrooms) that were added on to the original structure.
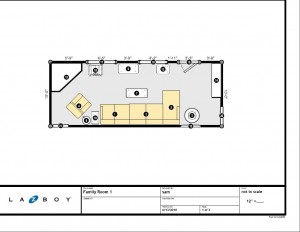 This is the new floor plan that I put together that I think will accomplish what we want. It provides for more seating and after 30 some odd years, finally gives Steph a chair she can call her own…the lounger on the right! And below is a description of the various pieces and their dimensions. This is the part where we were not impressed with the “design consultant”. *I* put this floor plan together and not once did the “design consultant” suggest an in-home visit to help us decide. And on top of which, she even told us that we would never be able to get a sectional, or what resembles one, in the size of room we have.
And of course, we still have to replace the carpeting as well as paint the upper part and the ceiling.
And so now begins the adventure…..check back and check back often! And please don’t read the police blotter section in the Amherst Bee…you won’t find us there! If you have any suggestions, ideas, wish to take sides, care to make a contribution, say prayers, etc. please drop me a note!
Now this is my favorite kind of projects….the BIG makeover. Of course you can have a sectional in that room and on that wall. Also a favorite chair where you have placed one. You also have room on both sides of the t.v. for small upright chairs if you need extra seating for any reason. What colors are you thinking of? After the description of the sofa you presently have I fear for anyone health’s if that sit on it…..hurry and redo before Norm and I come for a visit!
Please feel free to leave suggestions on colors and idea’s! Evelyn, some thoughts please!
Ok, I love this type of thing! I had a room almost this size once. First of all I would do it in stages. Not all at once. I would go with the TV hanging on the wall first. The reason for this is you have two things that are going to be pricey. The TV idea and the sectional and chairs. It’s a great idea on the TV, AND it will give the room an immediate larger feeling. You can have a custom cabinet built (with lights) around the TV in the wall, it can extend under the windows for window seats (extra seating). You can literally have seats built with some cabinets or drawers below and get a local seamstress to whip up some bench cushions. If you don’t want to use it as “window seats” take the cushions off and you have a long cabinet. It’s a flex space. Paint the custom cabinets to match your bookshelf.
If you are feeling the heebie jeebies from the “microbes” in the furniture..depending on how long you want to wait out each stage in the process, you can get a sofa & chair cover. They sell them all over the place. I would go with a cheap one since you are planning to replace. Otherwise get the Lysol out LOL!!!
Doing it in stages gives you the clout to get the very best TV set. You don’t have to settle for a cheaper version of what you want. You can get a Blueray DVD player and all the toys!
If it was me, and I have lived with some funky paneling in my day, I would paint the wood walls. The fact that it’s good wood will make the outcome that much better. I would go with a mellow Swiss Coffee or something warm and inviting. I would paint the brick behind the wood stove too…I have actually done this. It makes the room look so much cleaner and larger. You have to use special paint on the brick…cement paint. It’s a do it yourself project.
Not sure about your ceiling, but if it’s possible to put in some pot lights, or even track lighting ( as long as there are no cords showing) that might be a nice option. They have some amazing modern track lights that are nothing like the old ones….these are small.
How about putting in some wood floors with colorful rugs in place of wall to wall? Most wall to wall carpet places these days also do wood floors. If you decide to go with a wood floor, it’s usually the first thing to do. You can price the floors at Home Depot.
I totally renovated a 1979 house and brought it up to 2007 standards…I did a whole lot of the work myself, including knocking down three walls. Yep, ME!! Took me forever, but it was worth it. When I finally sold it, there was a bidding war! : )
xxoo Deb
I have to say that I love painted wood….men don’t. I painted all the wood paneling in an area of our house and love it….also had Norm make a beautiful wooden “cover” for our fireplace so painted wood is my thing. Men like their wood like it comes from a tree….raw and natural.
I think Deb and I could fly to Buffalo and get this project done in no time. She requires some wine and I require decaf-iced tea with lobster thrown in on the side.
I have absolutely no furniture arranging hints at all. I have no abilities at all there. However, I am with Deb and Evelyn…first thing I’d do is paint the wood :). The color of what you have is really pretty but it limits your ability to modernize the room…a LOT. You’re tied to that one color and that one style.
And I agree with Deb…if you’re going to replace flooring, go with either hardwood or Pergo. It’s so much easier to clean, it is very low maintenance, and it’s really pretty 🙂
There was my two cents. I think I’ll probably get some change back 😉
Now wait a second… Deb and Evelyn are going to Buffalo!! This calls for a social at Sam’s house — Seriously!! We all need to stand around to catch your BTE if you do ANY painting at all!!!
I think it’s wonderful that you are remodeling – can’t wait to see the AFTER pictures…. more trips to the library must be in the future plans